
We offer a wide collection of free, high-quality printable coloring pages for kids and adults. From cute animals to intricate mandalas, our designs bring creativity and relaxation to everyone. Download, print, and start coloring today!

Table of Contents
A Complete Step-by-Step Guide for Beginners
Learning how to draw a simple orange is one of the most rewarding and accessible drawing exercises for artists of all skill levels. Whether you’re a complete beginner picking up a pencil for the first time or an experienced artist looking to practice basic shapes and shading techniques, drawing an orange offers the perfect combination of simplicity and artistic challenge.
In this comprehensive guide, we’ll walk you through the entire process of creating a realistic orange drawing, from the initial basic circle to adding vibrant colors and finishing touches. By following these six simple steps, you’ll master the fundamentals of fruit drawing and develop essential skills that will enhance your overall artistic abilities.
Why Start with Drawing an Orange?
Drawing an orange is an excellent starting point for several reasons. First, oranges have a simple, recognizable shape that’s easy to replicate. Second, they offer opportunities to practice essential drawing techniques like creating perfect circles, adding dimensional elements, and working with color gradients. Third, oranges are readily available for reference, making it easy to study their texture, color variations, and natural lighting effects.
The orange’s spherical shape teaches fundamental concepts of three-dimensional drawing, while its distinctive color provides excellent practice for color theory and blending techniques. Additionally, the simple addition of a stem and leaf creates opportunities to practice organic shapes and contrasting textures.
Materials You’ll Need
Before we begin our step-by-step orange drawing tutorial, gather these basic materials:
Essential Drawing Tools:
- Pencils (2H, HB, 2B for different line weights)
- Eraser (both kneaded and standard)
- Drawing paper (medium texture works best)
- Blending stumps or tortillons
- Ruler or compass for perfect circles
For Colored Versions:
- Colored pencils (orange, yellow, red, green)
- Markers or crayons
- Watercolor paints (optional)
- Fine-tip pens for details
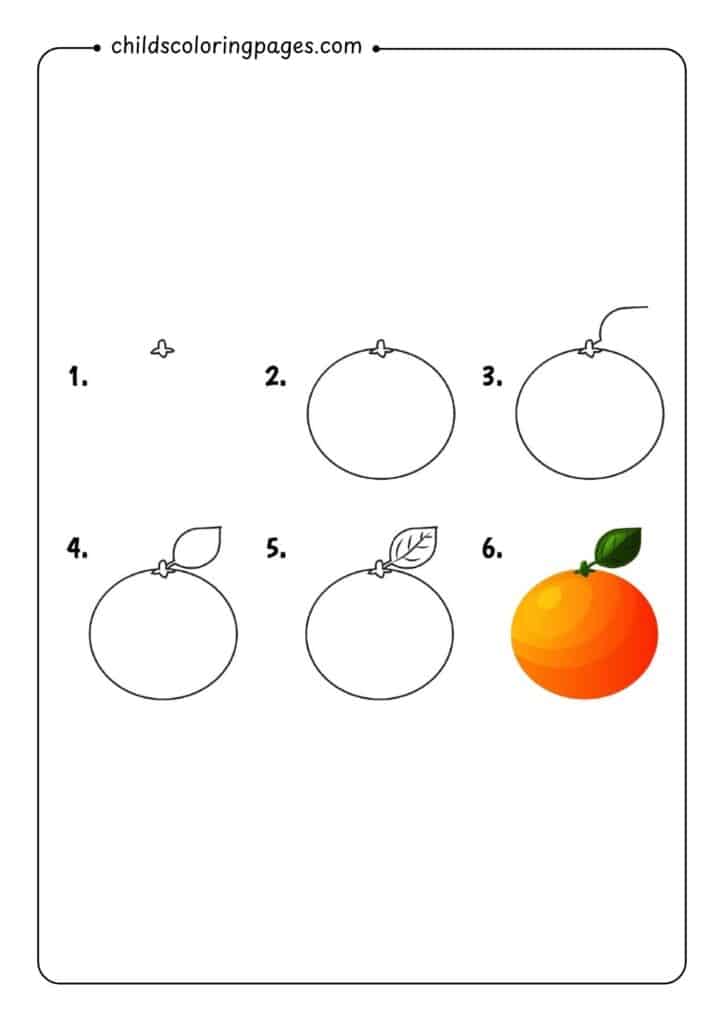
Step 1: Drawing the Basic Circle Foundation
The first step in drawing a simple orange involves creating a perfect circle. This foundational shape will determine the overall proportion and success of your orange drawing.
Start by lightly sketching a circle using your pencil. Don’t worry about making it perfect immediately – you can refine the shape as you go. If you’re struggling with freehand circles, use a compass or trace around a circular object like a cup or lid. The key is to create a smooth, even circle that will serve as your orange’s basic form.
Focus on making your circle proportional and well-centered on your paper. Leave enough space around the circle for adding the stem and leaf in later steps. Remember, this initial circle doesn’t need to be dark or heavily defined – light, confident strokes work best for this foundation stage.
Step 2: Adding the Stem Connection
Once you have your basic circle established, the next step involves adding the small stem attachment at the top. This tiny detail is crucial for making your drawing recognizably orange-like rather than just a generic circle.
Draw a small, slightly curved line extending upward from the top of your circle. This stem connection should be subtle – approximately one-tenth the width of your main circle. The stem creates a natural focal point and adds authenticity to your orange drawing.
Make sure the stem is centered at the top of your circle and curves slightly to one side. This small asymmetry adds natural character to your drawing and prevents it from looking too geometric or artificial.
Step 3: Creating the Stem Extension
Building upon the stem connection from step two, now extend the stem upward with a gentle curved line. This extension should be roughly the same length as the stem’s width, creating a balanced proportion that looks natural and realistic.
The stem extension should curve gracefully, mimicking how real orange stems grow. Avoid making it perfectly straight or too dramatic in its curve. Study real oranges or reference photos to understand how stems naturally extend and bend.
This step begins to give your orange drawing more character and personality. The curved stem suggests natural growth patterns and adds visual interest to what might otherwise be a static circular shape.
Step 4: Adding the Basic Leaf Shape
The fourth step introduces the leaf element, which transforms your simple circle into a recognizable fruit drawing. Start by sketching a basic leaf shape attached to the stem area. The leaf should be oval or teardrop-shaped, with one end pointed and the other end connecting to the stem region.
Position the leaf so it appears to grow naturally from the stem area. The leaf should be proportionate to the orange – not too large that it overwhelms the fruit, but substantial enough to be clearly visible and recognizable. A good rule of thumb is to make the leaf approximately one-third the diameter of the orange circle.
Keep the leaf shape simple at this stage. Focus on getting the basic form and positioning correct before adding any details or refinements. The leaf should complement the orange’s circular shape without competing for attention.
Step 5: Refining the Leaf with Details
Now it’s time to add character and realism to your leaf. Begin by adding a central vein line running from the base to the tip of the leaf. This midrib should be subtle but clearly visible, as it’s a key identifying feature of most leaves.
Next, add smaller veins branching off from the central line. These secondary veins should curve gently toward the leaf’s edges, creating a natural, organic pattern. Don’t overdo the vein details – three to five smaller veins are usually sufficient for a simple leaf drawing.
Refine the leaf’s outline, adding subtle curves and minor irregularities that make it look more natural. Real leaves aren’t perfectly symmetrical, so small variations in the outline will enhance the realistic appearance of your drawing.
Step 6: Adding Color and Final Details
The final step transforms your line drawing into a vibrant, realistic orange. Begin by establishing the base color using orange colored pencils, markers, or paints. Apply the color evenly across the entire orange surface, leaving some areas slightly lighter to suggest natural highlighting.
Add depth and dimension by creating darker orange or reddish tones in the lower portions of the fruit. This shading suggests the orange’s three-dimensional form and creates visual weight that makes the fruit appear to rest naturally on a surface.
For the leaf, use various shades of green, from light yellow-green for highlights to deeper forest green for shadows and vein details. The contrast between the warm orange tones and cool green colors creates visual interest and makes both elements stand out effectively.
Advanced Techniques for Orange Drawing
Once you’ve mastered the basic six-step process, consider incorporating these advanced techniques to enhance your orange drawings:
Texture Creation: Add subtle texture to suggest the orange’s dimpled skin by lightly stippling or creating small circular patterns across the surface. This technique adds realism and visual interest to your drawing.
Light and Shadow: Study how light falls on spherical objects and add corresponding highlights and shadows to your orange. The brightest highlight should appear on the side facing the light source, while the darkest shadow should be on the opposite side.
Background Elements: Consider adding simple background elements like a table surface or shadow beneath the orange to ground the object in space and create a more complete composition.
Common Mistakes to Avoid
When learning how to draw a simple orange, avoid these frequent pitfalls:
- Making the initial circle too small or too large for your paper
- Creating perfectly symmetrical elements that look unnatural
- Over-detailing the leaf with too many veins or complex shapes
- Using colors that are too bright or unrealistic
- Neglecting to add sufficient contrast between light and dark areas
Conclusion
Drawing a simple orange using this six-step method provides an excellent foundation for developing fundamental drawing skills. From creating basic geometric shapes to adding organic details and applying color theory, this exercise encompasses many essential artistic techniques.
Remember that improvement comes with practice. Don’t be discouraged if your first attempt doesn’t match your expectations. Each drawing session builds your skills and confidence. Try drawing oranges from different angles, with varying lighting conditions, or in different color schemes to continue challenging yourself and expanding your artistic abilities.
The techniques you learn from drawing oranges will transfer to other subjects, making this simple exercise a valuable investment in your artistic development. Whether you’re drawing for relaxation, artistic expression, or skill development, the humble orange provides an perfect subject for creative exploration and technical growth.