
We offer a wide collection of free, high-quality printable coloring pages for kids and adults. From cute animals to intricate mandalas, our designs bring creativity and relaxation to everyone. Download, print, and start coloring today!
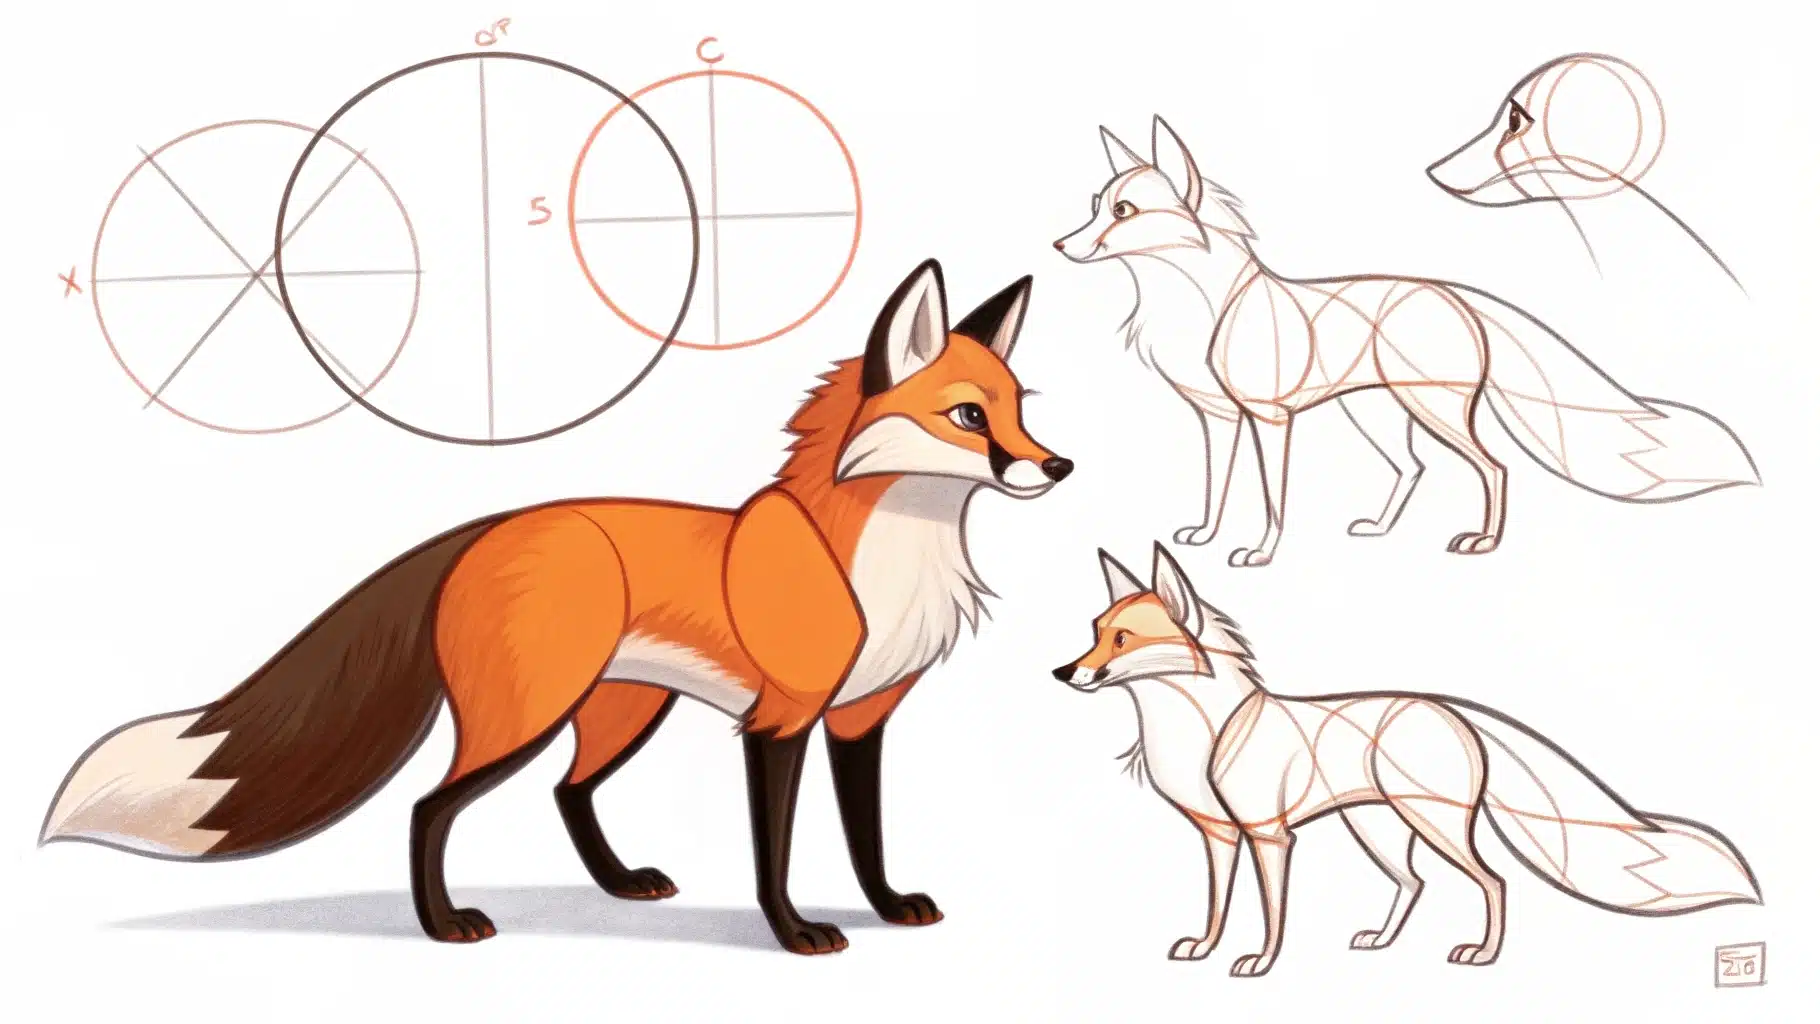
Table of Contents
A Complete Step-by-Step Tutorial for Beginners (How to Draw a Fox)
Drawing a fox can seem challenging at first, but with the right approach and step-by-step guidance, anyone can create a beautiful fox illustration. Whether you’re a complete beginner or looking to improve your animal drawing skills, this comprehensive tutorial will walk you through the entire process from basic shapes to a fully colored fox.
Why Learn to Draw a Fox?
Foxes are among the most beloved animals in art and illustration. Their distinctive features, including pointed ears, sharp snouts, and bushy tails, make them perfect subjects for developing your drawing skills. Learning to draw a fox will help you understand animal anatomy, proportions, and basic shading techniques that apply to many other creatures.
Materials You’ll Need
Before we begin, gather these basic drawing materials:
- Pencils (HB, 2B, and 4B for different line weights)
- Eraser (kneaded eraser works best)
- Drawing paper or sketchbook
- Colored pencils, markers, or digital drawing tools (optional for coloring)
- Blending stump or tissue for shading
Step 1: Start with the Basic Fox Head Shape
Begin your fox drawing with the most recognizable feature – the head. Draw a simple triangular or diamond-like shape that’s slightly rounded at the bottom. This will serve as the foundation for your fox’s face.
The key to this first step is keeping your lines light and loose. Don’t worry about perfection at this stage; you’re simply establishing the basic proportions. The head shape should be wider at the top where the ears will be positioned and narrower toward the snout area.
Think of this initial shape as a simplified version of a fox’s skull structure. Real foxes have elongated faces with prominent cheekbones, which is why we start with this angular approach rather than a perfect circle.
Step 2: Add the Distinctive Fox Features
Now it’s time to bring your fox to life by adding its most characteristic features. Start by drawing two pointed triangular ears at the top of the head shape. Fox ears are proportionally large compared to their head size, so don’t be afraid to make them prominent.
Next, add the eyes. Fox eyes are typically almond-shaped and positioned about one-third of the way down from the top of the head. Place them symmetrically on either side of an imaginary center line.
The snout is crucial for achieving that fox-like appearance. Draw a small triangular nose at the bottom point of your head shape, then add a small curved line beneath it to suggest the mouth. The nose should be black and slightly heart-shaped for authenticity.
Step 3: Develop the Body Structure
With the head established, it’s time to add the body. Start by drawing a curved line that flows from the back of the head downward. This will become the fox’s back and the beginning of its famous tail.
Add two simple lines for the front legs, keeping them relatively straight and positioned directly under the head. Fox legs are slender but sturdy, so avoid making them too thick or too thin.
The chest area should curve outward slightly from the head, creating a natural flow from the neck to the body. Keep this step simple – you’re still working with basic shapes and proportions.
Step 4: Complete the Body Outline
Now expand your fox drawing by completing the full body silhouette. The fox’s body should be compact and streamlined, with a slight curve to the back that flows naturally into the tail.
Add the distinctive fox tail, which is one of their most recognizable features. The tail should be thick and bushy, curving around the body in a graceful S-shape. Make it proportionally large – a fox’s tail is typically about 60% of their body length.
Complete the legs by adding the back legs and paws. Fox paws are small and neat, almost cat-like in appearance. The back legs should be slightly bent, showing the natural posture of a sitting fox.
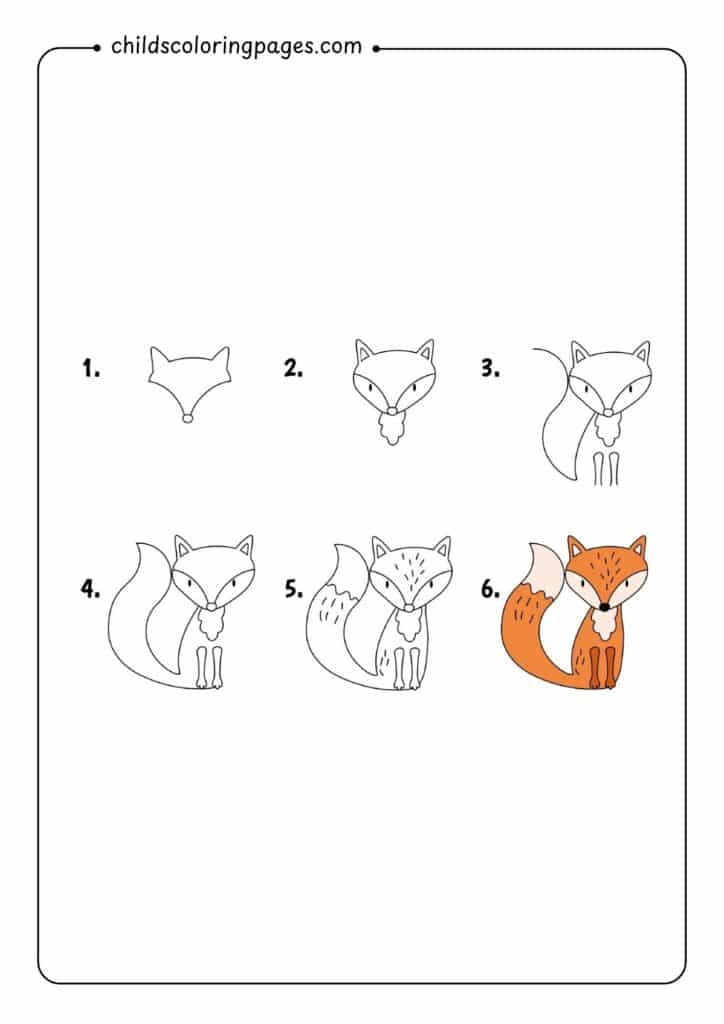
Step 5: Add Texture and Details
This is where your fox drawing really comes to life. Start adding fur texture throughout the body using short, quick strokes. Focus on areas where fur naturally changes direction, such as around the face, chest, and legs.
Pay special attention to the tail, which should look fluffy and full. Use varied line weights to create depth and dimension. Darker lines can suggest shadows and depth, while lighter lines work well for areas where light hits the fur.
Add more detail to the facial features. Define the eyes further by adding pupils and small highlights. Enhance the nose and add subtle shading around the snout area. Consider adding small details like whiskers or inner ear texture.
Step 6: Color and Final Touches
The final step transforms your line drawing into a vibrant, finished artwork. Traditional fox coloring includes a rich orange-red for the main body, white for the chest and inner ears, and black for the nose, eyes, and ear tips.
When coloring, think about light direction. Typically, light comes from above and slightly to one side. This means the top of the head, back, and upper portions of the tail should be lighter, while the underside and areas in shadow should be darker.
For the orange areas, start with a base color and then add deeper oranges and browns for shading. The white areas should have subtle gray shadows to give them dimension rather than leaving them completely white.
Tips for Success
Start Light: Always begin with light pencil strokes. You can always darken lines later, but it’s difficult to remove dark marks completely.
Study Real Foxes: Look at photographs of real foxes to understand their proportions and coloring. Notice how their ears relate to their head size and how their tails curve.
Practice Basic Shapes: Before attempting a full fox, practice drawing the individual components – triangular ears, almond eyes, and curved tails.
Be Patient: Don’t rush the process. Each step builds on the previous one, so take your time to get each stage right before moving forward.
Common Mistakes to Avoid
Many beginners make the ears too small or position them incorrectly. Fox ears should be large and prominent, positioned at the top outer corners of the head.
Another common error is making the snout too short or too long. The fox snout should be proportional to the head – about one-third the length of the entire head.
Avoid making the tail too thin. A fox’s tail is one of its most distinctive features and should be full and bushy, not thin like a cat’s tail.
Advanced Techniques
Once you’ve mastered the basic fox drawing, try experimenting with different poses. Foxes are very expressive animals, so consider drawing them in various positions – running, jumping, or curled up sleeping.
Experiment with different art mediums. While pencil is perfect for learning, try recreating your fox with watercolors, digital art, or even ink and markers for different effects.
Conclusion
Drawing a fox is an excellent way to develop your artistic skills while creating something beautiful and engaging. By breaking down the process into manageable steps – from basic shapes to detailed features to final coloring – you can create a professional-looking fox illustration regardless of your current skill level.
Remember that improvement comes with practice. Don’t be discouraged if your first fox doesn’t look exactly like you imagined. Each drawing is a learning experience that brings you closer to mastering this charming subject.
The techniques you learn from drawing foxes will serve you well in other animal drawings. The principles of starting with basic shapes, adding details progressively, and finishing with color and texture apply to virtually any subject you might want to draw.
Keep practicing, stay patient with yourself, and most importantly, enjoy the creative process. Before long, you’ll be drawing foxes with confidence and developing your own unique artistic style.