
We offer a wide collection of free, high-quality printable coloring pages for kids and adults. From cute animals to intricate mandalas, our designs bring creativity and relaxation to everyone. Download, print, and start coloring today!
Table of Contents
How to Draw a Cake Easy: A Step-by-Step Guide for Beginners
Drawing a delicious-looking cake doesn’t have to be complicated. Whether you’re a beginner artist, teaching children, or just want to create cute illustrations for your projects, learning how to draw a cake easy can be both fun and rewarding. This comprehensive guide will walk you through six simple steps to create a beautiful cupcake drawing that looks good enough to eat.
Why Learn to Draw Cakes?
Before we dive into the tutorial, let’s explore why cake drawing is such a popular skill. Cake illustrations are versatile and can be used for birthday cards, party invitations, menu designs, social media posts, or simply as a relaxing creative activity. The rounded, soft shapes of cakes make them perfect for beginners who want to practice basic drawing techniques without getting overwhelmed by complex details.
Materials You’ll Need
To get started with this easy cake drawing tutorial, you’ll need minimal supplies:
- Paper (any type will work)
- Pencil for sketching
- Eraser for corrections
- Black pen or marker for outlining
- Colored pencils, markers, or crayons for the final touches
The beauty of this tutorial is that you can follow along with whatever drawing materials you have on hand. The techniques work equally well whether you’re using digital drawing tools or traditional paper and pencil.
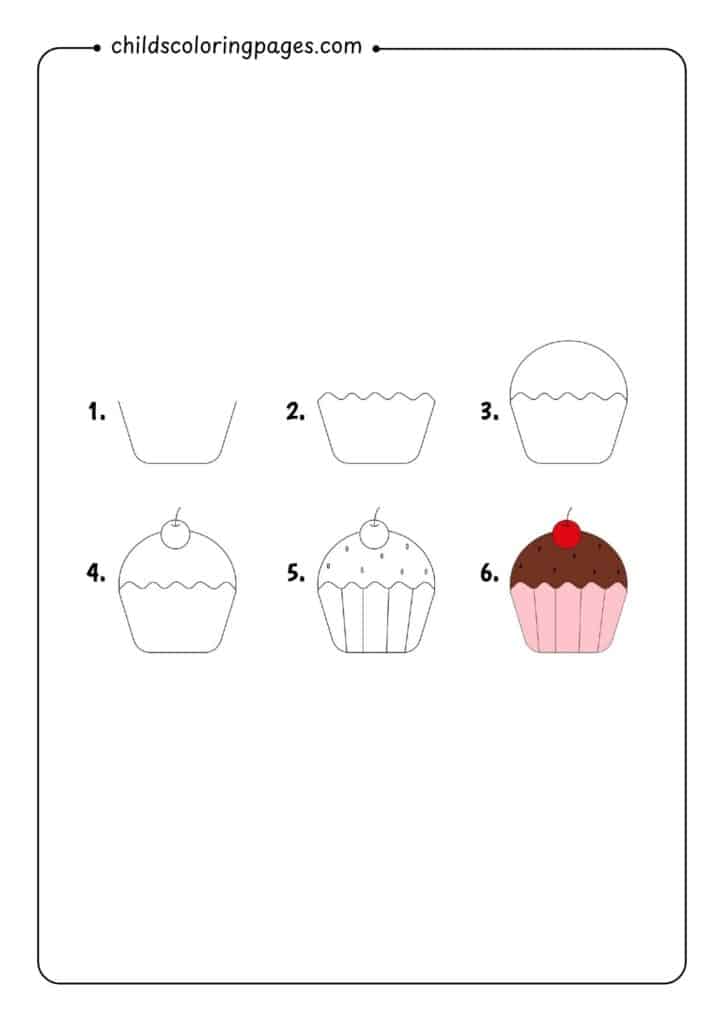
Step 1: Create the Basic Cupcake Base
The foundation of any good cake drawing starts with getting the proportions right. Begin by drawing a simple trapezoid or bucket shape for the cupcake base. This shape should be wider at the top than at the bottom, resembling a muffin liner or cupcake wrapper.
Start with light pencil strokes, as you’ll want to refine the shape as you go. The base should take up about one-third of your overall drawing space, leaving room for the frosting and decorations above. Make sure the sides curve slightly inward as they go down, creating that classic cupcake wrapper appearance.
Don’t worry about making it perfect – the slight imperfections will actually make your drawing look more natural and hand-drawn, which adds to its charm.
Step 2: Add the Frosting Foundation
Once you have your cupcake base, it’s time to add the frosting. This is where your cake really starts to take shape. Draw a wavy, cloud-like line across the top of your cupcake base. This represents the bottom edge of the frosting where it meets the cake.
The wavy line should be irregular and organic-looking, as real frosting naturally has bumps and curves. Think of how frosting looks when it’s been piped or spread onto a real cupcake – it’s never perfectly smooth. This wavy foundation will serve as the base for building up your frosting layers.
Make sure the frosting extends slightly beyond the edges of the cupcake base on both sides. This creates the illusion that the frosting is generous and overflowing, which makes the cake look more appetizing and realistic.
Step 3: Build Up the Frosting Dome
Now comes the fun part – creating the full frosting dome. Above your wavy foundation line, draw a large, rounded dome shape. This dome should be roughly the same height as your cupcake base, creating a balanced proportion between the wrapper and the frosting.
The dome doesn’t need to be a perfect circle. In fact, it’s better if it’s slightly irregular, as this makes it look more like real, fluffy frosting. Add another wavy line about halfway up the dome to create layers and dimension in your frosting.
This layered approach gives your cake drawing depth and makes it look more three-dimensional. Real frosting often has natural ridges and layers from the piping process, so mimicking this in your drawing adds authenticity.
Step 4: Add the Cherry on Top
No classic cupcake is complete without a cherry on top! Draw a small circle at the very peak of your frosting dome. This will be your cherry. Add a small curved line extending upward from the cherry to create the stem.
The cherry should be proportionally small compared to the rest of the cupcake – about the size of a marble if your cupcake were real. Position it slightly off-center for a more natural, less rigid appearance.
Don’t forget to add a tiny leaf or two at the base of the stem. These small details might seem minor, but they make a significant difference in the overall appeal of your drawing.
Step 5: Add Decorative Details
This step is where your cake drawing really comes to life. Add small decorative elements to make your cupcake look more realistic and appealing. Draw small circles, dots, or sprinkles scattered across the frosting surface. These represent chocolate chips, sprinkles, or other decorative elements commonly found on cupcakes.
You can also add vertical lines to the cupcake base to represent the pleated texture of a cupcake liner. These lines should follow the contour of your base shape, curving slightly as they go down.
Consider adding a few small highlights or reflected light spots on the frosting dome. These can be represented by small oval shapes or crescents that remain uncolored when you add color later. These highlights will make your frosting look shiny and more dimensional.
Step 6: Color Your Masterpiece
The final step is adding color to bring your cake drawing to life. Traditional cupcake colors work well for beginners: use pink for the cupcake base, brown for the chocolate frosting, and bright red for the cherry.
When coloring, use smooth, even strokes and try to maintain consistent pressure. For the frosting, you might want to use slightly different shades of brown to emphasize the layers and create depth. Leave the highlight areas you marked in step 5 uncolored or use a very light shade.
The cherry should be bright and vibrant – this pop of color draws the eye and makes the entire drawing more appealing. Use a darker red or burgundy for the cherry’s shadow side to give it dimension.
Tips for Success
To make your cake drawing even better, keep these professional tips in mind:
Use Reference Images: Look at real cupcakes or photos online to understand how light falls on different surfaces and how colors blend together.
Practice Proportions: The relationship between the cupcake base, frosting, and cherry is crucial for a believable drawing. If one element is too large or too small, the entire drawing can look off.
Add Shadows: Once you’re comfortable with the basic technique, try adding a simple shadow beneath your cupcake. This grounds the drawing and makes it look more three-dimensional.
Experiment with Variations: Once you master this basic cupcake, try different frosting styles, multiple cherries, or different decorative elements like candles or birthday messages.
Common Mistakes to Avoid
Even with a simple drawing like this, there are a few common pitfalls to watch out for:
Making the Cherry Too Large: The cherry should be a small accent, not the main feature. Keep it proportional to the rest of the cupcake.
Forgetting the Cupcake Wrapper Details: Adding those vertical lines to the base makes a significant difference in realism.
Using Too Much Pressure: Keep your pencil strokes light and buildable. You can always make lines darker, but it’s harder to make them lighter.
Rushing the Coloring: Take your time with the coloring step. Even, consistent coloring can make the difference between a good drawing and a great one.
Conclusion
Learning how to draw a cake easy is a valuable skill that opens up many creative possibilities. This six-step method provides a solid foundation that you can build upon as your confidence grows. Remember, the key to improvement is practice – don’t worry if your first attempt doesn’t look exactly like the example. Each drawing is a learning opportunity.
Whether you’re creating illustrations for a bakery, designing party invitations, or just enjoying a relaxing creative activity, this simple cake drawing technique will serve you well. The skills you develop here – understanding proportions, adding details, and using color effectively – will transfer to many other drawing projects.
So grab your drawing materials and start practicing. Before you know it, you’ll be creating cake drawings that look good enough to eat. Happy drawing!