
We offer a wide collection of free, high-quality printable coloring pages for kids and adults. From cute animals to intricate mandalas, our designs bring creativity and relaxation to everyone. Download, print, and start coloring today!
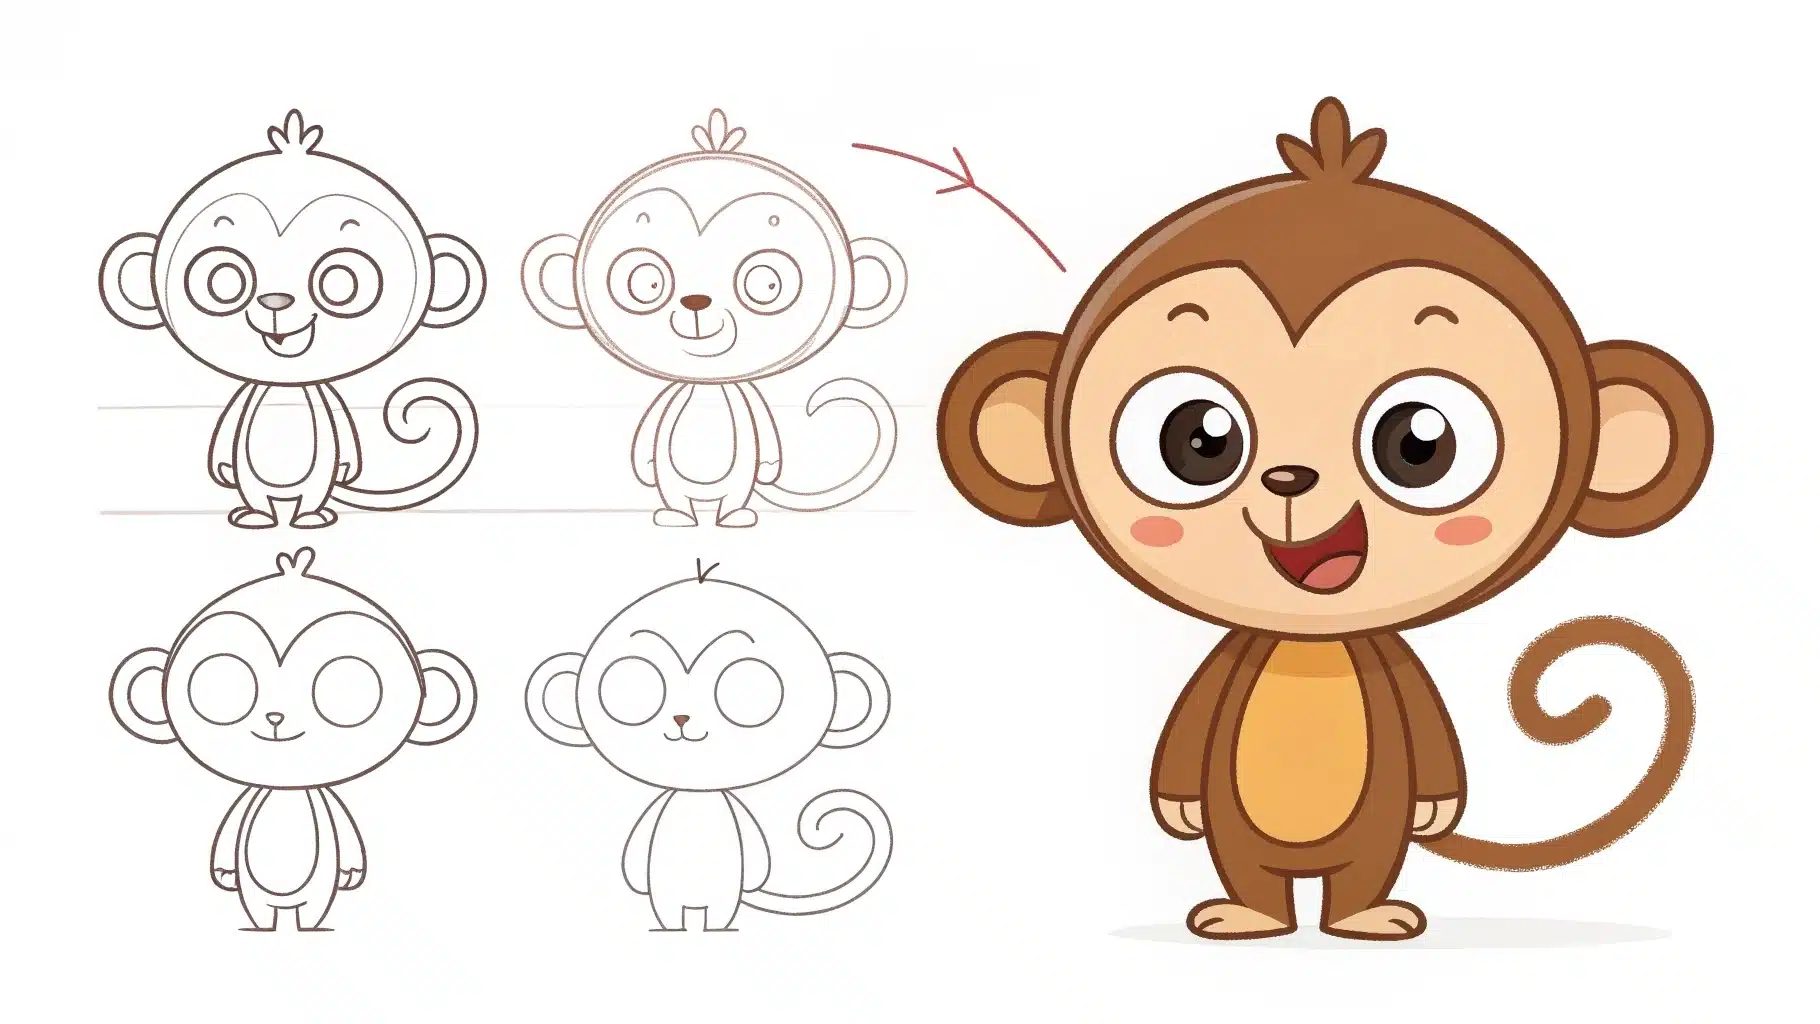
Table of Contents
A Complete Step-by-Step Guide for Beginners
Learning how to draw a monkey can be an incredibly rewarding artistic experience, whether you’re a complete beginner or looking to improve your animal drawing skills. Monkeys are fascinating creatures with expressive faces and dynamic poses that make them perfect subjects for drawing practice. In this comprehensive guide, we’ll walk you through everything you need to know about drawing monkeys, from basic shapes to detailed features.
Why Learn to Draw Monkeys?
Drawing monkeys offers unique benefits for artists of all skill levels. These primates share many anatomical similarities with humans, making them excellent subjects for understanding proportions, facial expressions, and body language. Their playful nature and varied poses provide endless inspiration for creative artwork.
Monkeys also appear frequently in children’s books, animations, and educational materials, making this skill valuable for aspiring illustrators and educators. Whether you want to create cartoon-style monkeys or realistic portraits, mastering monkey drawing techniques will significantly enhance your overall artistic abilities.
Essential Drawing Supplies
Before we begin our step-by-step monkey drawing tutorial, gather these basic supplies:
- Pencils: Use a range from 2H (light) to 4B (dark)
- Eraser: Both kneaded and white vinyl erasers work well
- Paper: Smooth drawing paper or sketchbook
- Blending tools: Tortillons or blending stumps (optional)
- Reference images: Photos of real monkeys or artistic references
Having the right tools makes the drawing process smoother and more enjoyable. Don’t worry if you don’t have professional supplies – even a basic pencil and paper will work perfectly for learning these techniques.
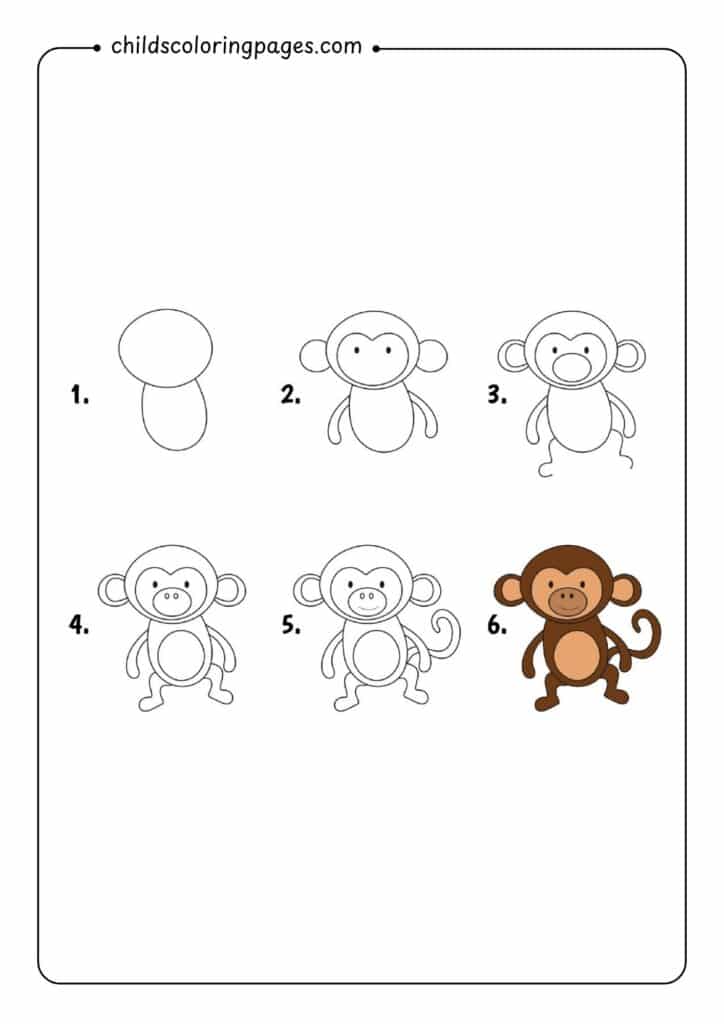
Step 1: Start with Basic Shapes
Every successful monkey drawing begins with simple geometric shapes. This foundation approach makes the process less intimidating and ensures proper proportions from the start.
Creating the Head: Begin by drawing a large circle for the monkey’s head. This circle doesn’t need to be perfect – a slightly oval shape often works better for most monkey species. Position this circle in the upper portion of your drawing area, leaving space below for the body.
Adding the Body: Below the head circle, draw an oval shape that’s roughly the same width but slightly taller. This oval represents the monkey’s torso. The distance between the head and body should be about half the diameter of the head circle.
Positioning Guidelines: Lightly sketch a vertical line through the center of both shapes to ensure proper alignment. Add a horizontal line across the middle of the head circle to help position facial features later.
Step 2: Define the Basic Structure
Now we’ll refine our basic shapes to create a more recognizable monkey silhouette.
Connecting Head and Body: Draw two curved lines connecting the head circle to the body oval, creating the neck area. Keep these lines gentle and natural-looking.
Adding Limb Guidelines: Sketch four lines extending from the body oval to indicate where the arms and legs will be positioned. Monkey arms are typically longer than their legs, so make the arm guidelines extend further from the body.
Creating the Tail: Most monkeys have long, curved tails. Add a flowing curved line extending from the lower back area of the body oval. The tail should be roughly as long as the body and head combined.
Step 3: Develop Facial Features
The face is often the most engaging part of any monkey drawing. Take time to develop these features carefully.
Eye Placement: Using your horizontal guideline, position two circles for the eyes. Monkey eyes are usually large and expressive, set relatively close together compared to human proportions.
Nose and Mouth Area: Draw a smaller oval or heart shape in the lower half of the face circle for the muzzle area. This protruding snout is characteristic of most monkey species.
Ear Positioning: Add two curved shapes on either side of the head for ears. Monkey ears are typically positioned higher than human ears and have a distinctive curved shape.
Step 4: Refine Body Proportions
With the basic structure in place, we can now refine the body to look more monkey-like.
Arm Development: Transform your arm guidelines into proper limb shapes. Monkey arms are muscular but slender, tapering from shoulder to wrist. Remember that monkey arms are proportionally longer than human arms.
Leg Structure: Develop the leg guidelines into realistic limb shapes. Monkey legs are powerful and well-muscled, especially in the thigh area. The lower legs taper toward the ankles.
Hand and Foot Basics: Add simple oval shapes at the end of each limb to represent hands and feet. We’ll develop these details further in the next steps.
Step 5: Add Detailed Features and Characteristics
This step brings your monkey drawing to life with specific details and characteristics.
Facial Expressions: Develop the eyes by adding pupils, eyelids, and eyebrows. Monkeys have very expressive faces, so consider what emotion you want to convey. Add nostrils to the nose area and define the mouth shape.
Hand and Foot Details: Monkeys have very human-like hands and feet. Add individual fingers and toes, keeping in mind that monkey thumbs are positioned differently than human thumbs. Their feet are more hand-like, with opposable big toes.
Fur Texture: Begin indicating fur texture with short, curved lines following the direction of hair growth. Pay attention to areas where fur patterns change direction, such as around the face and limbs.
Muscle Definition: Add subtle shading to indicate muscle structure, particularly in the arms, legs, and chest area. This adds dimensionality and realism to your drawing.
Step 6: Final Details and Shading
The final step involves adding depth, texture, and finishing touches to complete your monkey drawing.
Shading Techniques: Use various pencil pressures to create light, medium, and dark tones. Generally, shade areas that would be in shadow: under the chin, inside ears, beneath limbs, and along the sides of the body.
Fur Texture Refinement: Add more detailed fur texture throughout the drawing. Use short, quick strokes that follow the natural direction of monkey fur. Vary the length and density of these strokes for realistic texture variation.
Background Elements: Consider adding simple background elements like tree branches or jungle foliage to provide context for your monkey drawing.
Final Cleanup: Erase any remaining construction lines and refine edges where needed. Darken the most important lines and details to create visual hierarchy in your drawing.
Common Mistakes to Avoid
When learning how to draw monkeys, several common mistakes can hinder your progress:
Proportion Errors: Making the head too small or the limbs too short compared to real monkey anatomy. Always check your proportions against reference images.
Stiff Poses: Monkeys are naturally dynamic and playful. Avoid overly rigid, statue-like poses by incorporating natural curves and gestures.
Ignoring Reference: While stylization is valuable, understanding real monkey anatomy helps create more convincing drawings, even in cartoon styles.
Rushing the Process: Take time with each step. Building your drawing methodically produces better results than rushing to the finish.
Tips for Improvement
Study Different Species: Various monkey species have distinct characteristics. Spider monkeys have long, slender limbs, while baboons have more robust builds. Studying different types expands your drawing vocabulary.
Practice Gestures: Quick gesture drawings help capture the essence of monkey movement and personality. Spend time doing fast sketches focusing on pose and energy rather than details.
Use Photo References: Collect reference photos showing monkeys from different angles and in various poses. This reference library becomes invaluable for improving accuracy and inspiration.
Join Drawing Communities: Online art communities provide feedback, inspiration, and motivation to continue improving your monkey drawing skills.
Conclusion
Drawing monkeys successfully combines understanding basic shapes, animal anatomy, and artistic technique. By following these six detailed steps, you’ve learned to create monkey drawings that capture both accurate proportions and engaging personality. Remember that improvement comes through consistent practice and observation.
Whether you’re drawing realistic portraits or cartoon characters, these fundamental techniques provide a solid foundation for all your monkey artwork. Keep practicing, experimenting with different poses and expressions, and most importantly, enjoy the creative process of bringing these fascinating creatures to life on paper.
The key to mastering how to draw monkeys lies in patience, observation, and regular practice. Each drawing teaches you something new about form, proportion, and artistic expression. Keep your pencils sharp, your references handy, and continue exploring the wonderful world of monkey art!