We offer a wide collection of free, high-quality printable coloring pages for kids and adults. From cute animals to intricate mandalas, our designs bring creativity and relaxation to everyone. Download, print, and start coloring today!
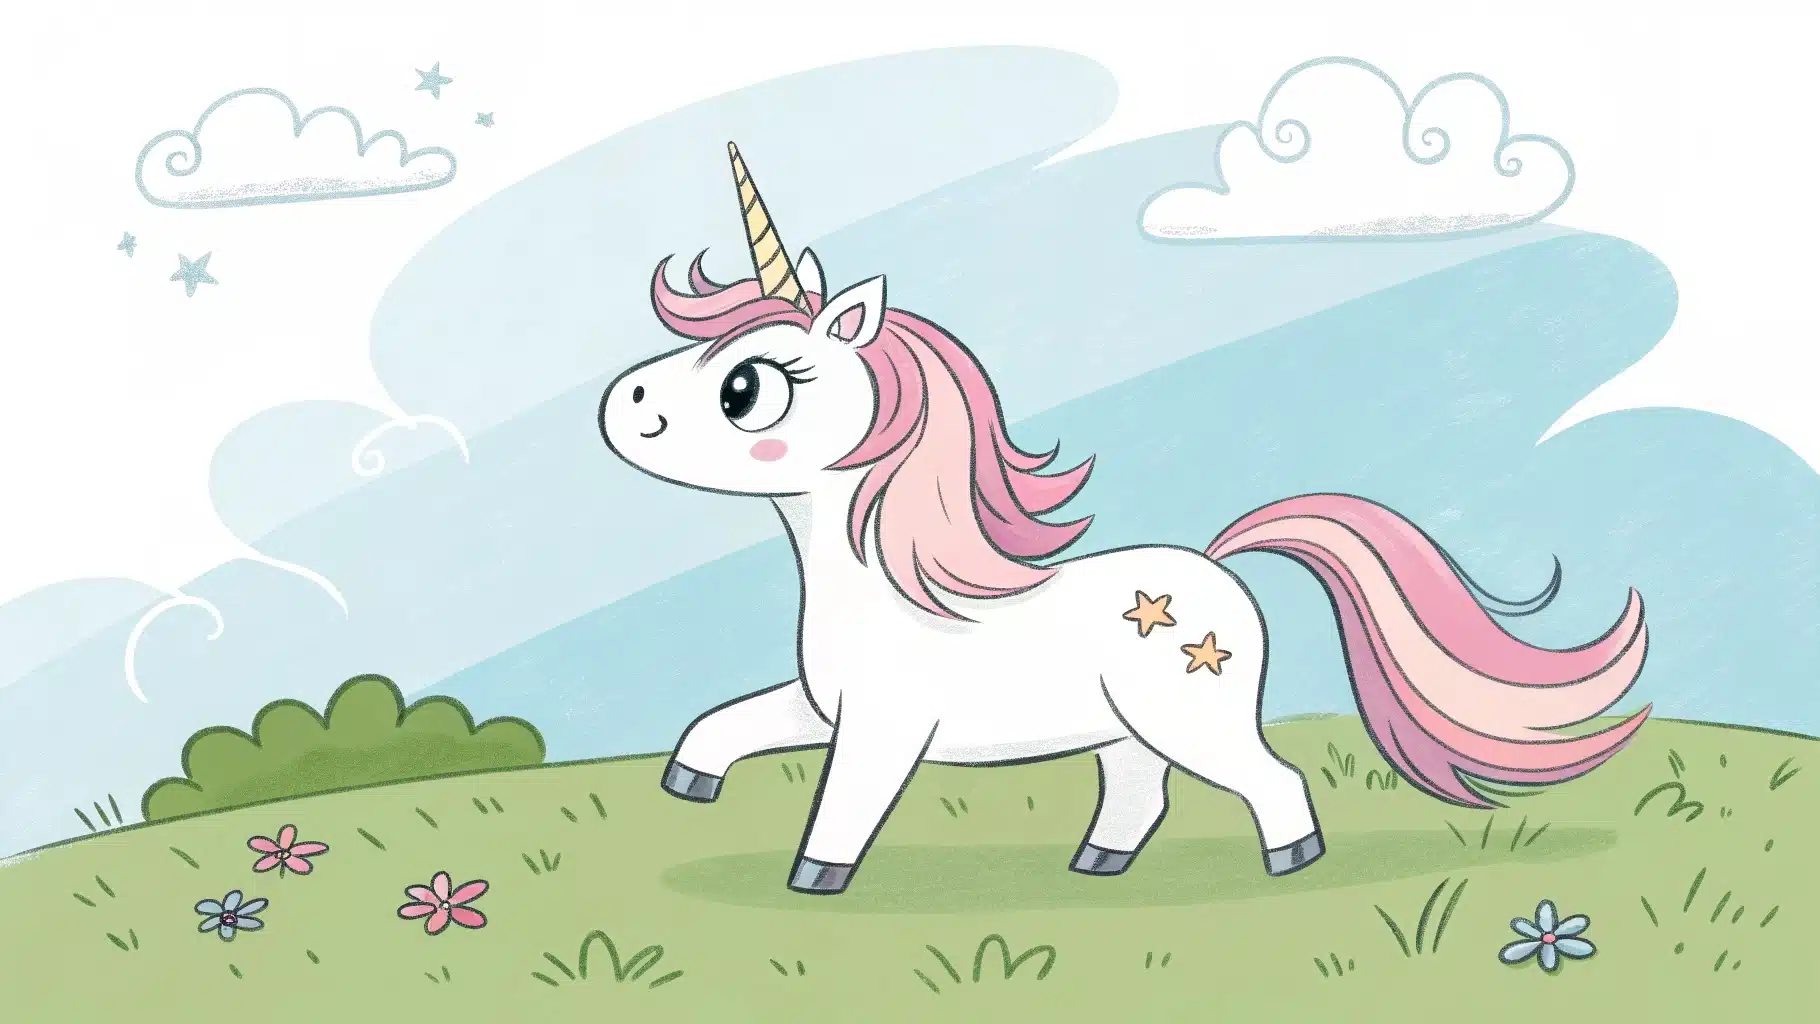
Table of Contents
Complete Step-by-Step Guide for Beginners
Drawing a unicorn might seem like a magical challenge, but with the right approach and step-by-step guidance, anyone can create this enchanting mythical creature. Whether you’re a beginner artist, teaching children, or simply looking to improve your drawing skills, this comprehensive guide on How to Draw a Unicorn will walk you through the entire process of drawing a beautiful unicorn from start to finish.
Why Learn to Draw Unicorns?
Unicorns have captured human imagination for centuries, representing purity, magic, and wonder. Learning to draw these mythical creatures offers numerous benefits for artists of all ages. Drawing unicorns helps develop fundamental artistic skills including proportion, shading, and color theory. For children, unicorn drawing encourages creativity and imagination while building fine motor skills and concentration.
The popularity of unicorns in modern culture makes this skill particularly valuable for artists interested in fantasy art, children’s book illustration, or digital art. From birthday party decorations to personalized gifts, knowing how to draw unicorns opens up countless creative possibilities.
Essential Drawing Supplies for Your Unicorn
Before starting your unicorn drawing journey, gather the right materials to ensure the best results. You’ll need basic drawing pencils ranging from 2H for light sketching to 2B for darker lines and shading. A good eraser is crucial for making corrections and creating highlights. Quality drawing paper with a slight texture will help your pencil grip the surface better.
For the coloring phase, consider colored pencils, markers, or watercolors depending on your preferred medium. Colored pencils offer the most control for beginners, while markers provide vibrant, consistent colors. Watercolors can create beautiful, dreamy effects perfect for magical unicorns.
Understanding Unicorn Anatomy and Proportions
Before diving into the step-by-step process, it’s important to understand basic unicorn anatomy. Unicorns are essentially horses with a horn, so studying horse proportions will significantly improve your unicorn drawings. The head should be roughly one-seventh of the total body length, with the neck making up about one-third of the body height.
The horn, or alicorn, traditionally spirals and should be proportionate to the head size. Most artists make the horn about half the length of the head for balanced proportions. The mane can be flowing and elaborate, often depicted as more voluminous and magical than a regular horse’s mane.
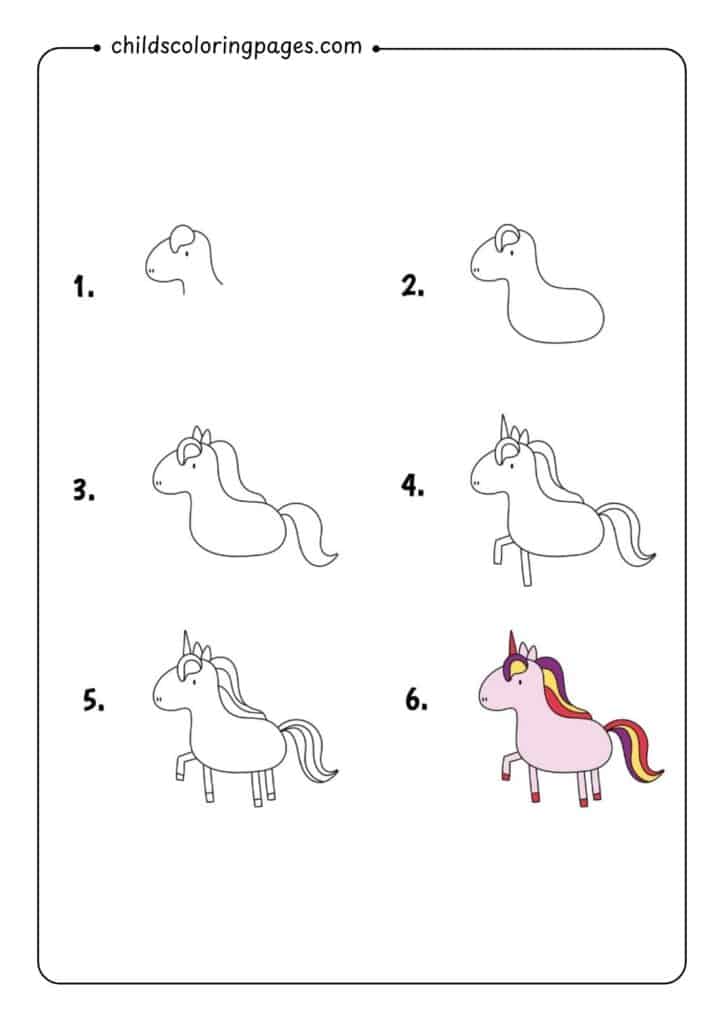
Step 1: Starting with the Basic Head Shape
Begin your unicorn drawing with a simple oval shape for the head. This oval should be slightly narrower at the bottom to create the basic horse head structure. Position this shape in the upper portion of your drawing space, leaving room for the neck and body below.
The initial head shape doesn’t need to be perfect – you’ll refine it as you progress. Focus on getting the general size and position right. This foundation step is crucial because all other elements will be built upon this basic shape. Take your time with this step, as a well-proportioned head will make the rest of your drawing much easier.
Step 2: Adding the Neck and Body Foundation
From the bottom of your head oval, draw two curved lines extending downward to form the neck. The neck should be roughly cylindrical but slightly curved, wider where it connects to the head and tapering as it approaches the body area.
Next, add a larger oval or rounded rectangle for the main body. This shape should be positioned below and slightly behind the neck, creating the classic horse silhouette. The body should be roughly twice the size of the head oval. This step establishes the basic framework that will guide the rest of your drawing.
Step 3: Developing Facial Features and the Horn
Now it’s time to add the distinctive unicorn horn and refine the facial features. Position the horn at the center-top of the forehead, drawing it as a straight or slightly curved cone extending upward. The horn should taper to a sharp point and can include spiral ridges for a traditional look.
Add the eye as an almond shape positioned in the upper portion of the head oval. The nostril can be indicated with a small curved line near the bottom of the head shape. Begin sketching the ear as a pointed triangular shape on top of the head, positioned behind the horn. These features bring your unicorn to life and establish its magical character.
Step 4: Adding Legs and Basic Structure
Create four legs extending from the body oval using simple straight lines initially. Horse legs are longer than many people expect – they should be roughly equal to the body height. The front legs should be positioned near the front of the body oval, while the back legs connect toward the rear.
Each leg consists of several segments: the upper leg (thigh), the lower leg, and the hoof. Start with basic lines to establish the leg positions and proportions. The hooves should be drawn as small ovals or rectangles at the bottom of each leg. This step transforms your unicorn from a floating head and body into a complete standing creature.
Step 5: Refining the Body and Adding the Mane
With the basic structure complete, begin refining your unicorn’s body shape. Smooth out the connection between the neck and body, creating flowing curves that look natural. Add muscle definition to the chest and haunches to give your unicorn a more realistic, powerful appearance.
The mane is where you can really let your creativity shine. Unicorn manes are typically more elaborate than regular horse manes, often flowing and voluminous. Draw the mane starting from behind the ears and horn, cascading down the neck in flowing curves. You can make it as simple or as elaborate as you like – some artists prefer sleek, straight manes while others create wild, curly styles.
Don’t forget to add the tail, which should complement the mane’s style. The tail should flow naturally from the rear of the body, and like the mane, can be as simple or elaborate as you prefer.
Step 6: Adding Color and Final Details
The final step brings your unicorn to life with color and finishing touches. Traditional unicorns are often depicted in white or pale colors, but modern interpretations embrace rainbow colors, pastels, or any color scheme you prefer. Popular color combinations include white with silver accents, pastels like pink and purple, or even bold rainbow gradients.
Start by establishing your base color for the body – this is typically the lightest shade in your color scheme. The mane and tail can incorporate multiple colors, either in distinct sections or blended together. The horn can be colored to complement the overall design – traditional gold or silver work well, but rainbow horns are also popular.
Add shading to give your unicorn dimension. Identify your light source and add shadows on the opposite sides of forms. This typically means shading under the belly, behind the legs, and on the far side of the neck and body. Highlights can be added to the horn, eyes, and areas where light would naturally reflect.
Common Mistakes to Avoid When Drawing Unicorns
Many beginning artists make similar mistakes when drawing unicorns. One common error is making the horn too large or positioning it incorrectly – remember, it should be centered on the forehead and proportionate to the head size. Another frequent mistake is rushing through the basic shapes, leading to proportion problems that become difficult to fix later.
Pay attention to leg positioning and length. Legs that are too short make the unicorn look stumpy, while legs that are too long create an awkward appearance. The neck length is also crucial – too short makes the unicorn look compressed, while too long creates an unnatural giraffe-like appearance.
Tips for Different Skill Levels
Beginners should focus on mastering the basic six-step process before attempting variations. Practice drawing the same unicorn multiple times to build muscle memory and improve consistency. Don’t worry about making it perfect on your first attempt – improvement comes with practice.
Intermediate artists can experiment with different poses, perspectives, and styles. Try drawing unicorns in motion, from different angles, or in various environments. Adding backgrounds can create more complete, storytelling artwork.
Advanced artists might explore realistic anatomy, complex lighting effects, or stylized interpretations. Consider studying actual horse anatomy to make your unicorns more believable, or develop your own unique artistic style for depicting these magical creatures.
Conclusion: Your Magical Drawing Journey
Learning to draw unicorns is a rewarding artistic journey that combines technical skill development with creative expression. By following these six fundamental steps – from basic head shape to final coloring – you’ve built a solid foundation for creating beautiful unicorn artwork.
Remember that every artist develops their own style over time. Use this guide as a starting point, but don’t be afraid to experiment and make each unicorn uniquely yours. Whether you’re drawing for personal enjoyment, teaching others, or developing professional illustration skills, the magic of unicorn drawing lies not just in the final result, but in the creative process itself.
Keep practicing, stay patient with yourself, and most importantly, have fun bringing these magical creatures to life on paper. With each unicorn you draw, you’ll discover new techniques and develop greater confidence in your artistic abilities. The world of fantasy art awaits your unique creative vision!